In later chapters we will look at how to install and use Objective-C on Windows and Linux systems for those that do not have access to Mac OS X. If you are planning to develop iPhone applications (or Mac OS X applications for that matter), however, you are
going to need to use an Intel based Mac OS X system at some point in the future.
Perhaps the biggest advantage of using Mac OS X as your Objective-C learning platform (aside from the ability to develop iPhone and Mac OS X applications) is the fact that you get to use Apple's Xcode development tool. Xcode is a powerful and easy to use
development environment that is available free of charge to anyone fortunate enough to own an Apple computer running Mac OS X.
In this chapter we will cover the steps involved in installing Xcode and writing and compiling a simple Objective-C program in this environment. For those readers that prefer to do their coding and compiling at the command prompt we will then cover use of
Objective-C in a terminal window.
Installing Xcode on Mac OS X
Xcode may or may not be pre-installed on your Mac OS X system. To find out if you already have it, open the Finder and look for it in theDeveloper subfolder of the
Applications folder. If the Developer folder does not exist, or does not contain Xcode then you will need to install it.
The best way to obtain Xcode is to download it from the Apple web site. It can also be installed from the Developer Tools installation disk if you happen to have one, but most Mac systems do not ship with this. The URL to download Xcode ishttp://developer.apple.com/technology/xcode.html.
There are two forms of Xcode, one for developing both Mac OS X and iPhone applications and the other solely for developing Mac OS X applications. In order to download Xcode, you will need either a Registered iPhone Developer account (in the case of the iphone
Xcode) or an ADC membership (in the case of the Mac OS X Xcode). Fortunately, both of these memberships are free and can be activated using your existing Apple account (for example the one you use to buy music on iTunes).
Once you have registered, you will gain access to the Apple Developer Connection web site where download links are provided for Xcode on a variety of Mac OS X versions.
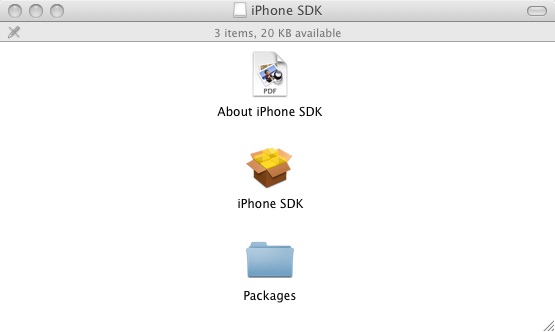
The download is over 2GB in size and will take a number of hours to complete depending on the speed of your internet connection. The package takes the form of a disk image (.dmg) file. Once the download has completed, a new window will open as follows displaying
the contents of the .dmg file:
<style type="text/css">
<!--
-->
</style>

If this window does not open by default, it can be opened by clicking on the SDK disk drive icon on the desktop.
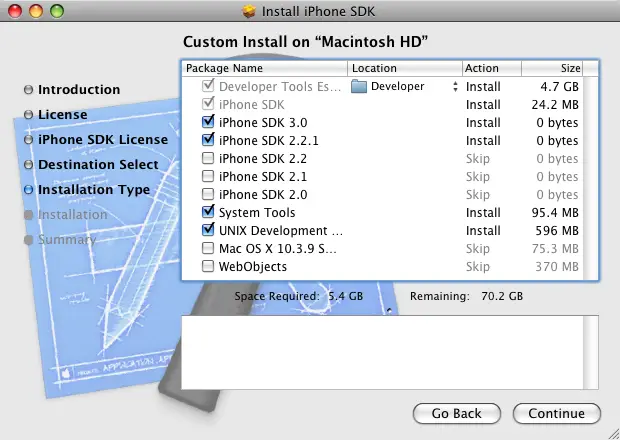
Initiate the installation by double clicking on the package icon (the one that looks like an opening box) and follow the instructions until you reach theCustom Install screen:

The default selections on this screen are adequate for most requirements so unless you have specific needs there is no need to alter these selections. Continue to the next screen, review the information and clickInstall to begin the installation. Note
that you may first be prompted to enter your password as a security precaution. The duration of the installation process will vary depending on the speed and current load on the computer, but typically completes in 15 - 30 minutes.
Starting Xcode
Having successfully installed the SDK and Xcode, the next step is to launch it so that we can write and then compile a sample Objective-C application. To start up Xcode, open the Finder, click theMacintosh HD device in the left had panel then double
click on the Developer folder, followed by theApplications folder. Within this folder you should see an icon for Xcode. Double click on this icon to launch the tool. Once Xcode has loaded, and assuming this is the first time you have used
Xcode on this system, you will be presented with theWelcome screen. On this screen, click on the option to
Create your first Cocoa application to proceed to the developer documentation screen.
Starting a New Project
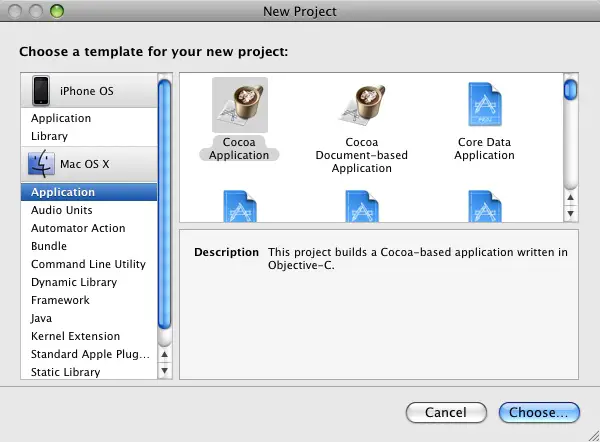
Each application created in Xcode is contained within a project. The first step in developing an application, therefore, is to create a new project. This is achieved by selecting theFile -> New Project... menu option. The
New Project window provides a range of different types of Mac OS applications that can be created. If you downloaded and installed the iPhone version of the SDK, options are also provided to create a new iPhone application:

To configure the project type, perform the following steps:
- Under the Mac OS X section, scroll down the list and select Command Line Utility.
- In the main panel, choose Foundation Tool then click on the Choose.. button.
- In the resulting panel, enter sampleApp in the Save As: field.
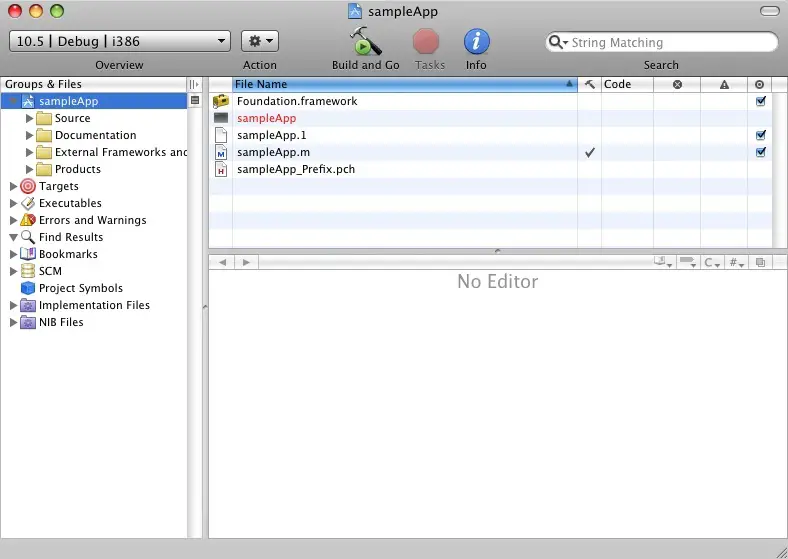
By default, Xcode will put the project files in your Documents folder so be sure to create or specify a specific folder for your Objective-C development work before proceeding. Once you have defined a name and location for your project click theSave
button to continue. Xcode will subsequently create the new project and open the main Xcode window:

Writing an Objective-C Application with Xcode
Xcode will create skeleton versions of the files needed to build a command-line based Objective-C application. Objective-C source files are identified by the.m filename extension. In the case of our example, Xcode has pre-created a main source file
namedsampleApp.m and populated it with some basic code ready for us to edit. To view the code, selectsampleApp.m from the list of files so that the code appears in the editor area beneath the list. The skeleton code reads as follows:
#import <Foundation/Foundation.h>

int main (int argc, const char * argv[]) {
    NSAutoreleasePool * pool = [[NSAutoreleasePool alloc] init];

    // insert code here...
    NSLog(@"Hello, World!");
    [pool drain];
    return 0;
}
Modify the NSLog line so that it reads:
NSLog(@"This is my first Objective-C App!");
With the change made, the next step is to compile and run the application by selecting theBuild and Run option located in the Xcode
Build menu. Once this option has been selected, Xcode will compile the sources and run the application within a terminal window:
<style type="text/css">
<!--
-->
</style>

Compiling Objective-C from the Command Line
While Xcode provides a powerful environment that will prove invaluable for larger scale projects, for compiling a running such a simple application as the one we have been working with in this chapter it is a little bit of overkill. It is also a fact that
some developers feel that development environments like Xcode just get in the way and prefer to use a basic editor and command line tools to develop applications. After all, in the days before integrated development environments came into favor, this was how
all applications were developed. Whilst I'm not suggesting that everyone abandon Xcode in favor of thevi editor and GNU compiler, it is useful to know that the option to work from the command line is available.
Using your favorite text or programming editor, create a file named hello.m containing the following Objective-C code:
#import <Foundation/Foundation.h>

int main (int argc, const char * argv[])
{
        NSAutoreleasePool * pool = [[NSAutoreleasePool alloc] init];

        NSLog (@"hello world");
        [pool drain];
        return 0;
}
Save the file and then open a Terminal window (if you aren't already working in one), change directory to the folder containing the source file and compile the application with the following command:
gcc -framework Foundation hello.m -o hello
Assuming the code compiles without error it can be run as follows:
./hello
2009-09-25 15:51:11.528 hello[3371:10b] hello world
Compared to using Xcode that seems much simpler, but keep in mind that the power of Xcode really becomes evident when you start developing larger scale projects.
Before moving on to learning the basics of the Objective-C programming language, we will cover the installation and use of Objective-C on non-Mac OS X systems.
分享到:


相关推荐
可以使用GNUstep在Windows XP上寫Objective-C程式,但是Objective-C已經加了很多新東西,而GNUstep裡的gcc並不提供,所以,这个是GNUstep,再加上新一代的編譯器架構Clang與LLVM(這也是Apple在新版Xcode裡預設使用...
Xcode 是运行在操作系统Mac OS X上的集成开发工具(IDE),Swift 是一种支持多编程范式和编译式的开源编程语言,苹果于2014年WWDC(苹果开发者大会)发布,用于开发 iOS,OS X 和 watchOS 应用程序。Swift 结合了 C ...
快照程序旨在在iOS 7.0或更高版本或Mac OS X Mavericks(10.9)或更高版本上运行。 要求 快照程序需要ARC,并且应在Xcode 5.1或更高版本中进行编译和测试。 快照程序将GitHub框架用于其模型对象。 您将需要执行git ...
biginteger 对象 BigInteger 类实现不可变的任意精度整数。 它提供了执行常用算术运算以及模算术、GCD 计算、素性测试、素数生成和其他一些杂项运算的方法。... BigInteger-MacOSX编译静态库的 Mac OS X 版本。
Mac OS X 上的批量更新文件名 您可以使用某种格式重命名文件夹中的许多文件。 建造 您可以下载源代码自行构建! 要求 Mac OS X 10.10 + Xcode 6.1 编译 打开ExTBatchFile.xcodeproj Xcode 菜单 → 产品 → 运行 ...
应该在开有Xcode的Mac OS X上进行编译。 Linux 建立基本要素 Gnustep Gnustep-devel 提供了一个makefile来编译和(静态)链接一个独立的可执行文件。 用法示例 执照 根据GNU通用公共许可证分发,请参阅 作者 ...
安装您可以从下载已编译的可执行文件,也可以克隆源代码并在自己的系统上对其进行编译。建造在构建之前,请确保存在以下框架:/ Library / PrivateFrameworks BWToolkitFramework.framework Sparkle.framework ...
得益于本身健壮的架构和Apple的大力支持,Clang越来越全能,支持的项目越来越多,如Mac OS X 10.6时代的Xcode和Interface Builder等,皆由Clang编译。Clang的加入也代表着LLVM真正走向成熟。 此外,Clang有一个重要...
CloudFace基于opencv和云端的ios人脸检测系统使用手册:整次实验完成在 OS X Yosemite 10.10.3 上CloudFace_ios 文件夹:安装在手机上的程序。a. 适配手机:iPhone 6b. 编译器:Xcode Version 6.3.2 (6D2105)c. 编程...
3.2.2 Theos 安装及编译 26 3.2.3 Theos 用法简介 28 3.2.4 Theos 开发tweak 示例 47 3.3 Reveal 49 3.3.1 Reveal 简介 49 3.3.2 Reveal 安装及功能扩展 50 3.4 IDA 55 3.4.1 IDA 简介 55 3.4.2 ...
Loader - 一个 Mac OS X 应用程序,用于为 iPad 应用程序预加载数据。 公共数据模型位于 Common 文件夹中,并被两个项目引用。 用法 预加载数据库 要创建要使用的数据库,请编译并运行加载程序。 单击“加载数据”...
需要在您的 iPhone 上安装 OS X Yosemite 和 iOS 8。 安装 该项目使用 libphonenumber。 你可以从下载。 将 libphonenumber.a 放在 /opt/local/lib 或您喜欢的任何位置,并更新 XCode 中的链接器选项。 预编译的二...
在1.2版之前,该程序还可以在Mac OS X 10.6(或更高版本)上运行。 另外,在SL上编译的最后一次提交被标记为snow-leopard 。 这些早期版本可以使用Xcode 4.2(或更高版本)进行编译。 执照 TeaMenu是根据MIT许可...
杜比古鲁可可 这是的可可UI。 这段代码以前直接在主存储库中,但是由于我不再打算自己...Python 3.6+在“框架模式”下编译。 带有XCode命令行工具的MacOS 10.12+。 制作 您可以使用make构建应用程序: $ make $ make
Reign 适用于运行 OS X 10.7 及更高版本的 64 位 Mac。 克隆 Reign 依赖于 git 子模块,因此克隆 Reign 如下: $ git clone --recursive https://github.com/DangerCove/reign-for-spotify.git 编译 打开项目 ...
momdec是Mac OS X的命令行工具,它采用已编译的Core Data模型并对其进行反编译,以生成适用于Xcode的等效xcdatamodel或xcdatamodeld 。 生成的模型文件也可以与生成器一起使用,具有自定义子类的Core Data实体生成源...